Gooseneck Alternative

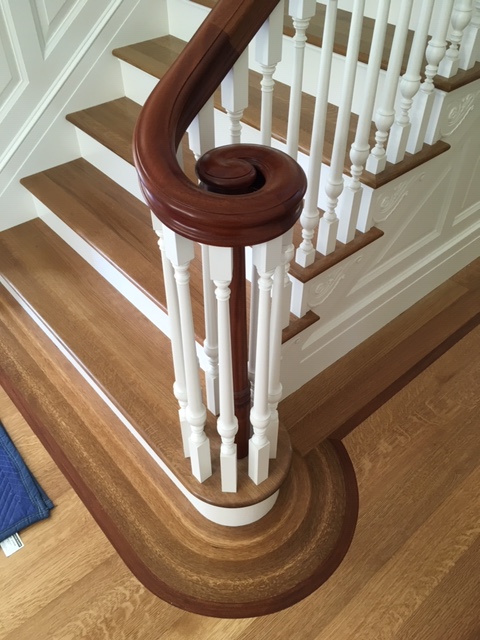
This is the handrail in question. Homeowner wants to upgrade and transform the sharp right angle bumpy ride of the goosenecks into smooth and graceful lines and curves.

11851.jpg
11855.jpeg

Here is the 3D drawings for the proposed changes

Oskar+2nd+flr.jpg
Oskar%252B1st%252Bto%252B2nd.jpg

Work in progress

20200628_175443.jpg
20200628_175535.jpg

Finished project.

14136.jpg
14128.jpg
14129.jpg
14141.jpg

It was a pleasure working with WH Stairs. My part in this job was to lay out, manufacture and ship the wreath fittings. WH Stairs took care of the rest. They did an amazing job doing the demo and installation of this new handrail and balusters.


Lets look at another job.

The original plan was a newel post at the winder with a four rise gooseneck. I suggested something different.

D8FD2DF3-.jpg

Lets start with a look at a drawing comparison of the gooseneck proposal on the left and a wreath fitting alternative on the right.

gooseneck+or+wreath.jpg

Now for a 3D drawing of the wreath fitting alternative.

gooseneck+3.jpg

Finished project

IMG_9842.jpg

Next one on the boards.

Turn this bumpy ride into smooth flowing curves.

20200312_103045.jpg

Done

20200910_080159.jpg
20200910_080144.jpg
20200925_121351.jpg

Moving forward.

Now that I have opened myself up for praise or criticism, I would like to comment on the pictures posted, further down on this blog under "Tangent Handrailing the Process" on March 31 2015.

As in all things we learn as we go and along the way we make changes as we see them. These pictures were taken some time ago while exploring a way for me to achieve the best possible end result with the tools and knowledge that I had at the time. I also thought these particular pictures provided a good visual of the process I was using at the time. Yes, I used the bevel cut method and not the square cut method and yes I like the falling molds and no I don't strictly use any of these methods today. New technology has changed the way I do things today and many of the tools that I used daily, I rarely use today. My drawings have gone from 2 dimension to 3D and my tools have changed from hand feed to hand programmed. I can now do things more consistently with greater accuracy and with a higher degree of safety. Having said that, I must say that without the background in the old art of "Tangent Handrailing" I would be somewhat lost even with the new technology available today. No matter which method you use, whether you are making face molds to apply on your block or 3D drawings to program your machine, the drawing is the key to success. Both schools have there challenges. Fairing a rail by eye with hand tools can at times be easier than with a 3D drawing program. However the main reason that I upgraded my process was mostly for safety reasons. Many of the old methods are very dangerous and I was reluctant to employ anyone because of the risks but now I feel confident to keep this craft alive and do it safely.

The craft of stairbuilding has changed since the so called "golden years".  Standardization and manufacturing have produced boxed components that the average homeowner can afford, and if done skillfully, they can really make a home special and add to its value. However, there are many who know the difference between custom and standard and are not afraid of the investment. This is where I hope to be able to contribute in keeping the stair design and balustrade up to the old classic glory and explore new designs in keeping with the rest of the modern home.   


Some Recent Projects

Walnut Wreath

3D drawing

3D drawing.

Completed wreath with 1-1/2" inside radius.

Completed wreath.


Saddle Back Balcony Fittings

3D drawing of saddle back  balcony rail.


Completed fittings.


Finished project.


Attic Stair Renovation

Attic Stair Renovation - Before.


Balcony walls and section of floor removed. 


Attic balcony walls - Before


Balcony walls removed and well hole expanded. Original stairs will be buried under new stairs.


Attic stair from bottom up - Before

After.


Elevation Drawing. Newel post was scaled down to fit room size.

Elevation Drawing.


Please feel free to comment, question or criticize.

Tangent Handrailing, the process.

The process begins with a drawing of the stair in plan and elevation with center line of rail and joint lines. From here we go to the the cad program on the computer using the "tangent method" to begin the process of obtaining patterns or molds to apply to our wood to guide us in the proper cutting out of our handrail. Once the face molds and falling molds are drawn, I print them out full scale with a plotter and spray glue them onto my block of wood.

These two section will be joined together to make one 180 degree wreath and is now ready for the joints or ends to be cut.


After the joints are cut, the bevels obtained from the drawing are applied.


Now the blocks are attached together aligning the bevels at the joint.


This top view shows the straight  bevel lines in red at center of joint are aligned which also bring all other line into alignment.


Square out lines on end of top section now appear proper, with the blocks at there actual elevation and pitch.


Now that  the sides are band sawed out things start to take shape.


Now it is time to apply the wall paper or falling mold.


I think we could all agree that an accurate drawing is invaluable when applying these molds.


Now I split the sections at the joint and cut the top and bottom of the sections separately.


Top half done.

Square out complete.

I can now join this to a nice over easing and begin shaping.


Shaping the profile is next.


Completed wreath and easing.